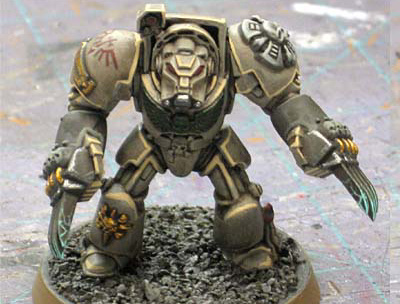
Tutorial: Painting Deathwing by Ron
20 November 2009 | 5th Edition
This is a really quick approach to getting Deathwing painted, and I mean fast with results that aren't too bad either.
Preparation
Changing the colour scheme
This is just my quick approach to what can be a extremely difficult army for some people to paint. The process is written for how I wanted my guys to look in the end. For example, I have black guns, dark green chest eagles, etc. If you want something different, adjust your steps accordingly.
Basing and conversions
I've kept my basing simple, but if you want to go with something different, again, just modify this as needed. I decided to copy the AoBR look for my force. It was a deliberate choice since I wanted to keep this army as simple as possible and do as little work as possible. We all have to have goals right?
All of my guys are attached to their bases a certain way to prevent them from looking like they're sinking into the ground. In order to make your models look like they are standing on top of the flock and sand on their base instead of looking like they are slightly sunk down into it… all you need to do is glue a thin piece of plasticard to the bottom of their feet before you glue them down to their base.
In this case, I picked up a plastic "For Sale" sign at my local hardware store and cut little pieces to fit under each foot.

I used GW sand for their bases. Nothing fancy, it's just glued down with white glue. All the models are cut from their sprue, cleaned of mould lines, assembled, attached to their base and the base is "sanded" before I start painting.
Paints and tools
Since there are only 11 guys in my force, I paint them one at a time. In order to minimize handling of the models while painting them, I use this little trick here.
I do not prime my models either. I just use the base colour as the "primer." Here are the paints I used. Like I mentioned before, you can use something close and get similar results I'm sure.
They're listed by what I call them, actual brand name (note: these are US paint brands) and then their use:
- Light grey (Americana Slate Grey) Main armour base colour and highlighting
- Dark grey (Ceramcoat Slate Grey) Everything else base colour
- Medium grey (Apple Barrel Pewter Grey) For highlighting
- Devlan Mud wash (GW) For weathering
- Dark red (Americana Napa Red) Purity seals
- Dark Angels Green (GW) For chest eagles
- Shining Gold (GW) For bells and whistles
- Dark silver (Folk Art Metallic Gunmetal Grey) For highlighting
- Light Tan (American Fawn) For highlighting
- Graveyard Earth (GW) For edge of base
- Light green (Apple Barrel Aquamarine) For power weapons
- Brown (Folk Art Nutmeg) For skin
- Light Brown (Americana Mississippi Mud) For purity seals
The process
Step 1: Painting light grey
I pretty much paint the entire model light grey. I don't worry about where I get it at this point, the idea is to cover the main armour areas. I want to make sure I have all of what would be called the "bone coloured armour" painted with the light grey. Make sure you have a good, smooth finish too. It takes me two light coats to do this.

Step 2: Painting dark grey
If it's not going to be the "bone coloured armour" when finished, it gets painted with dark grey. And I mean EVERYTHING. This includes the top of the base too. The base is done the dark colour to contrast against the lighter coloured armour and make the model stand out.

Step 3: Painting the Chapter icon
This might be added in with Step 2 but I made it into its own step so I could explain it better. Once I've got my light grey and dark grey areas set on the model, I go in and paint my Chapter icon. Here's how you can break down the icon into manageable shapes so you can paint it freehand. I don't add any extra script (on places like greaves) but if you wanted to, I would do it at this point and use the dark grey paint.

Step 4: The wash
I wash the entire model (including the top of the base) with Devlan Mud. Let this dry completely before moving on. I go pretty heavy with my wash since I really like the grimy look.
Step 5: The highlights
Right, there is no more "painting" really, just line highlighting. Seriously though, add some highlights and you're done. Just like you would line highlight something on a model, that's all I'm doing here.
If I break it down, it goes like this… in no specific order:
Armour
- Armour gets highlighted with the Light Tan
- Power cables, wires and breathing regulator with Dark Silver
- Chest eagle with DA green and then washed again with Devlan Mud
- Bells and whistles on armour with Shining Gold
- Eyes, sensors, and wax part of purity seals with Dark Red
- Paper part of purity seals with Light Brown
- Chapter icon with Dark Red
- Crux Terminatus with Medium Grey and then with Light Grey
Weapons
- Storm bolter casing highlighted with Medium Grey
- Power glove/Lightning Claw Gauntlets with Medium Grey
- Gun barrels and mechanisms with Dark Silver
- Weapon bells and whistles and ammunition with Shining Gold
- Heavy Weapon muzzles are done like this (use Steps 5 and 6 only)
- Any flesh gets highlighted with Brown
- Power weapon blades are done like this (except no basecoat in step 1 and use Devlan Mud again for step 3)
Bases
- First highlight with Medium Grey
- Second highlight of Light Grey
- Paint the edge with Graveyard Earth
And that's it, 5 Steps. Once you get the hang of it, you'll actually wait longer for your wash to dry than you will spend painting the entire model.
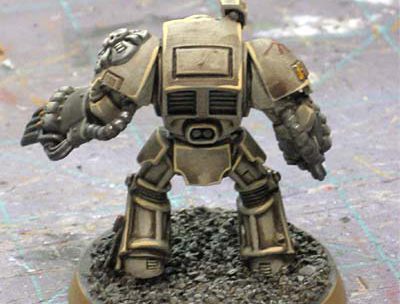
It won't win any Golden Daemon awards but it will give you a fully painted Deathwing in no time at all that looks like they've been through a couple of tough missions.
Good luck. Ron.


