Tutorial: Sponging battle damage
by Emilio
Adding battle damage to armour adds character and individuality to your models. There are many ways to accomplish this, here we look at sponging.
This is a very simple process and yields excellent results pretty quickly. But as with all these paint effects, less is more. Don't go too overboard on this and think carefully where the battle damage would be best applied for realistic effect.
And before you put paint to model experiment on scrap card or plastic sprue. Remember you have already painted the bulk of the model that you are applying the damage effect to — I'm guessing you don't want to start again. So master the technique first.
Here goes:
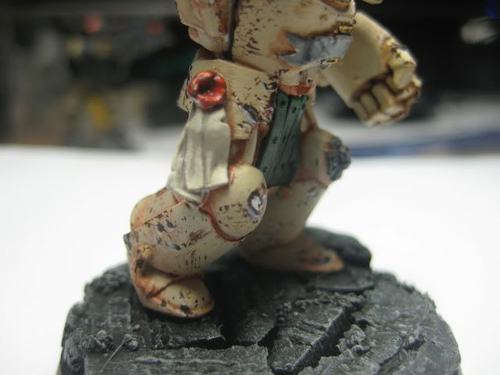
Step 1: the model
You need to start with a model that has at least its armour already painted. After the battle damage has been added it will be very fiddly to do much extra other than add washes. As you can see from the image, it's probably better to work on a model where the arms aren't yet fixed as damage can be more easily applied to the torso. You can battle damage the arms separately.

Step 2: the most important tool
Cut a small piece of sponge. The smaller the better as you can get it into nooks and crannies, helped of course by the arrowed shape shown below.

Step 3: applying the paint
Dipping the sponge in the appropriate colour (I used Scorched Brown) dab it on the edges and places most likely to be damaged. You don't want too much paint. Maybe just a little more than you'd have on a paintbrush when dry brushing. Try on some sprue first.

Step 4: 3D highlights
On the top parts of the damage spots add a line of black to represent shadow and along the bottom add a lighter version of the armour colour. This gives it a 3D effect.

Step 5: deeper damage
Finally you could add some metal to the largest, deepest battle-damaged areas. Do this sparingly.
A bit of experimentation with colours might be needed at stages 3 and 4 to suit personal taste or where you want to add damage to models with a different armour colour.
If you'd prefer, just skip the highlight stages 4 and 5 if you're OK with surface damage. For instance on black armour a sponge with a Fortress Grey or Boltgun Metal might be enough.
The same sponging process can be used on vehicles too. Because of the larger surface area keep the effect to a sensible level and vary the degree of denseness over the models area. Think carefully where the 'natural' damage will occur, apply that and then add any enemy-inflicted damage.
Happy battle damage sponging
Emilio


